Here is the link to the site that explains how to alter a CD... this is a GREAT project... Loved doing it!Shonna :)
Here are my version of the instructions from how I made my altered CD...
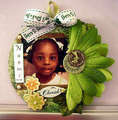
My altered CD...
Materials used:
Used CD
Ribbons
Petaloo Flowers (cut in half)
Prima Flowers
3 Birds Scrapaganza Paper
3 Birds Scrapaganza glitter chip board
3 Birds Scrapaganza chip board
Adhesive pearls
Decopauge - Plaid Mod Podge Gloss Lustre
Hot Glue
Glue Dots (mini and craft size)
Crop O Dile (hand held)
First I covered the CD with the Mod Podge on side one and put the patterned paper on... I prefer to use patterned paper rather than cardstock because it will soak up the Mod Podge faster and also dry faster. I did the same to side two. Then let the CD set for 10 mins. and then trim the edges.
Then I put a layer of Mod Podge on top of the pattern paper on side one and let dry. If you use a thin layer it dries pretty fast. Then I did my LO on top after the mod podge dried. Then after laying my picture, ribbon and pearls (there are pearls under the flowers, I completed the total frame of the picture), I put another layer of Mod Podge on the entire surface, covering the picture and the ribbon. This application was thicker than the first. I do this to protect the picture etc. since these won't be put in an album - most of the time - and will be out on a table or hanging...
After this dries is when I put the flowers and chipboard elements on.
I used a mixture of hot glue for big flower and glue dots for the smaller elements.
For her name I typed that on the computer on cardstock and printed that out and edged it with green ink...
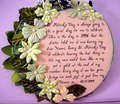
For the back I did not put an additional layer of Mod Podge over my journaling... (thinking maybe I should have) but that is up to you...
I printed that out off the computer and then trimmed away to fit over a bit so I could use the flowers on the side.
To make the whole I used my handy dandy Crop O Dile... LOVE THAT TOOL... cut a hole through that CD like a hot knife through butta...!!! :)
Hope you enjoy making this project as much as I did!!